All extension settings you can change here:
General configuration
- Include jQuery Library – turn off if jQuery library already exists. Mostly jQuery is already included.
- Development mode – turn on and popup will show every time.
Popup configuration
- Show popup – enables or disables popup window.
- Show After Seconds – popup delay time. 0 - no delay.
- Theme – popup theme. You can choose from 4 themes:
- Cookie Name – Name of cookie. If you change this, popup will show again for all customers.
- Cookie Lifetime (days) – Life time of cookie. After this time, popup will show again.
Additional fields
In additional fields you can add fields like: first name, last name, gender, etc. Additional fields could be “short text” type like email field and drop down type. These fields are showed above email field.
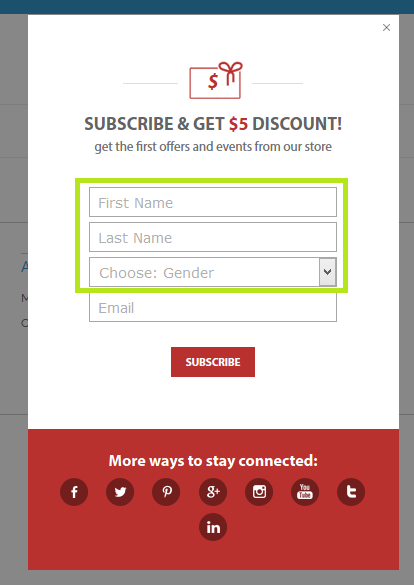
The next picture is an example, how to add additional fields.
Configuration guidelines:
- Options is required only for "Drop Down" type.
- For separating use "|".
- First Name field's name must be "firstname"
- Last Name field's name must be "lastname"
- Every time you add new fields, clear cache ("Flush magento storage")

Coupon configuration
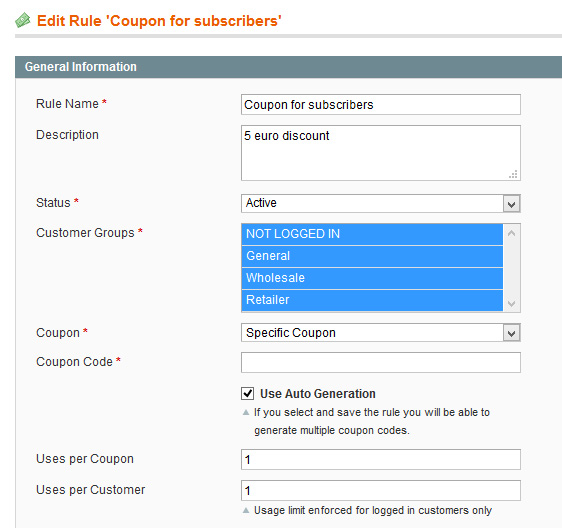
First you need to create a coupon.
Go to Admin Panel >> Promotions >> Shopping Cart Price Rules >> Add New Rule. Choose "Coupon – Specific Coupon“. Check "Use Auto Generation" or enter your coupon code. Set "Uses per coupon" and "Uses per customer" to 1.
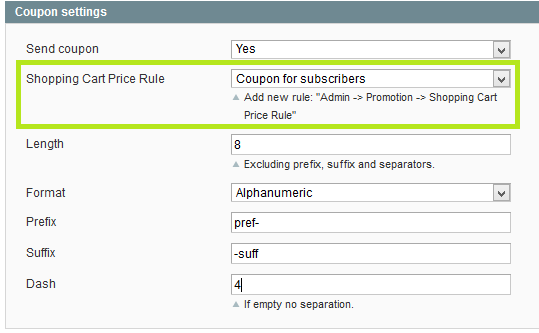
Join coupon and newsletter
Go to Admin Panel >> System >> Configuration >> MageTrend Extensions >> Newsletter Popup PRO >> Coupon Settings >> Shopping Cart Price Rule >> Choose your before created coupon and save settings.
Coupon settings
- Is Active – enables or disables coupon function.
- Shopping Cart Price Rule – there is a function which joines your coupon and newsletter.
- Length – Coupon code's length, excluding prefix, suffix, and separators.
- Format – Coupon code's format.
- Prefix/Sufix/Dash – Coupon code's settings.
Add coupon code to newsletter success email
Note: If you are using mailChimp service, you can skip this step.
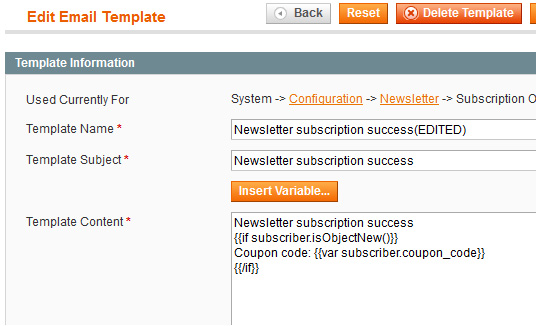
First go to Admin Panel >> System >> Transactional Emails >> Add New OR edit your already existing template. Insert this code in your template: {{var subscriber.coupon_code}}
Avoid re-subscribers
Note: If you are using mailChimp service, you can skip this step.
To avoid new coupon generation for already subscribed or resubscribed emails, use this code in template:
{{if subscriber.isObjectNew()}}
{{var subscriber.coupon_code}}
{{/if}}
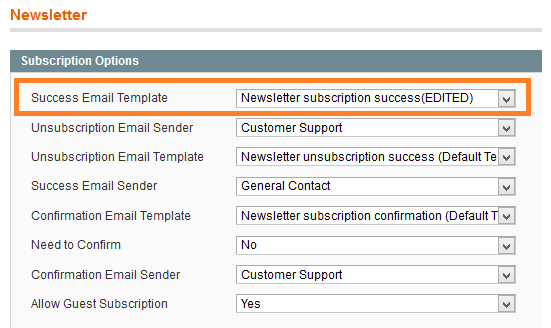
Set newsletter success email template
Note: If you are using mailChimp service, you can skip this step.
Set before already created template as primary template. Go to Admin Panel >> System >> Configuration >> Newsletter >> Subscription Options >> Success Email Template >> Choose your template.
Trigger button configuration
- Is Active - enables or disables trigger button.
- Button Text – text on button.
- Button and Popup Usage – set to “only button” and popup will not be shown. “Auto call and button” means that popup will be shown automatically and could be triggered with a button.
- Button Position – button has four default positions: left-center, right-center, left-bottom, right-bottom. Button has a fixed position.
- Position Top in px – vertical button position.